| |
|
|
|
|
|
|
|
|
|
|
|
|
|
|
|
|
|
|
|
|
|
|
|
|
|
9D-3
|
|
|
|
|
|
|
|
|
|
|
|
|
|
|
|
|
|
|
|
|
|
|
|
|
MODELS 2G-2GC-2GV PAGE 26
|
|
|
|
|
|
|
|
|
|
|
|
|
|
|
|
|
|
|
|
|
|
| |
|
|
|
|
|
|
|
|
|
|
|
|
|
|
|
|
|
|
|
|
|
|
|
|
|
| |
|
|
|
|
|
|
|
|
|
|
|
|
|
|
|
|
|
|
|
|
|
|
|
|
|
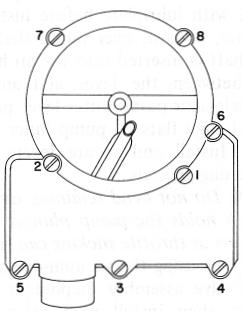
AIR HORN TIGHTENING SEQUENCE (Fig. 42)
|
|
|
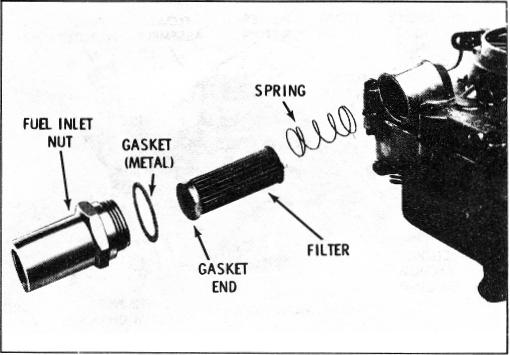
INSTALLATION OF FUEL INLET FILTER
|
|
|
| |
|
|
 |
|
|
|
|
|
(Fig. 43)
|
|
|
|
|
|
|
|
| |
|
|
|
|
|
|
|
|
|
|
|
|
|
|
|
|
|
|
|
|
| |
|
|
|
|
|
|
|
 |
| |
|
|
|
FIGURE 42
|
|
|
|
|
|
|
| |
|
|
|
|
|
|
|
|
|
|
|
|
| |
|
|
|
|
|
|
|
|
|
|
|
|
|
|
|
|
|
|
|
FIGURE 43
|
|
|
|
|
FINAL CARBURETOR ASSEMBLY - ALL MODELS
|
|
|
|
|
|
|
|
|
|
|
|
|
|
|
I. Install pump rod in pump lever by rotating rod to align squirt (if used) on rod with hole in lever. Upper end of rod faces air horn bore. Insert lower end of rod in hole in throttle lever securing with retaining clip provided.
|
|
|
|
|
|
|
|
|
|
|
|
|
|
|
| |
|
6. Install fuel inlet spring, filter gasket (if separate from filter), filter, fuel inlet gasket and nut following sequence in Figure 43. If filter is the metal bronze type, install filter with large open end facing fuel inlet nut. If no integral filter is used, install inlet screen, fuel inlet gasket and fitting.
|
| |
|
NOTE: If a clip is used on upper end of rod,
|
|
|
|
|
|
| |
|
install retaining clip provided, making sure of
|
|
|
|
|
|
| |
|
proper engagement of clip.
|
|
|
|
|
|
|
|
|
2. On 2GC models with choke housing on air horn, install choke rod in upper choke lever by rotating rod to align squirt on rod with hole in lever. Upper end of rod faces air horn bore. Install lower end of rod into hole in fast idle cam; then install fast idle cam ("RP" or part number on cam should face outward) on to float bowl, retaining with cam attaching screw. Tighten securely. If removed, install fast idle screw and spring in throttle lever, and install slow idle screw.
|
|
|
|
|
Tighten fuel inlet nut or fitting securely to prevent fuel leaks.
|
| |
ASSEMBLY OF CHOKE MOUNTED ON AIR HORN
|
| |
(2GC)
|
|
|
|
|
|
|
|
|
| |
|
1. Install choke baffle plate into choke housing.
|
|
|
|
| |
|
|
|
|
NOTE: Some early carburetors use a stat coil
|
|
| |
|
|
|
|
torque relief spring that is assembled on the
|
|
| |
|
|
|
|
choke shaft in the choke housing. This spring
|
|
| |
|
|
|
|
contacts a tang on the choke baffle plate when
|
|
| |
|
NOTE: The above does not apply to 2GC models with choke housing mounted on the throttle body (See steps 2 and 3, page 27).
|
|
|
|
|
|
|
|
|
the choke valve is from the completely closed
|
|
| |
|
|
|
|
|
|
|
|
|
position to 150 open. This prevents over
|
|
| |
|
|
|
|
|
|
|
|
|
choking and loading when starting with a partly
|
|
3. If used, install idle vent valve and shield, retain with
|
|
|
|
|
|
warm engine, by off-setting the torque of the
|
|
| |
attaching screw. Tighten securely.
|
|
|
|
|
|
|
|
|
|
|
thermostatic coil.
|
|
|
|
|
|
4. Install bracket for idle stop solenoid or C.E.C. valve, if used, by sliding ears of bracket over lug on float bowl and installing screw in bracket. Tighten screw securely and crimp ears of bracket around lug on float bowl. Insert idle stop solenoid or C.E.C. valve in hole in bracket, install large lockwasher aligning tabs with slots in bracket. Install large retaining nut, tightening securely. Bend back retaining tabs on lockwasher over flats on nut to hold securely.
|
|
|
|
|
The choke valve must be in the wide open position when installing the baffle plate in the choke housing to prevent damaging the stat coil torque relief spring. If the relief spring is not installed properly, the choke valve may be locked in the closed position. Check to be sure choke valve is free.
|
| |
|
2. On water heated choke models, install inner cover and outer cover assembly in choke housing. If inner and outer cover were disassembled, install gaskets and align inside index marks. Tighten screw securely.
|
| |
|
CAUTION: Do not overtighten nut to the point where bracket distortion results.
|
|
|
|
|
|
| |
|
|
|
|
|
|
3. Install choke stat cover and coil assembly and gasket using (3) attaching screws and retainers.
|
5. Readjust the solenoid screw to the correct speed specified by the vehicle manufacturer.
|
|
|
| |
|
|
|
To adjust thermostatic coil, rotate cover until choke
|