


Care must be taken when removing the
accelerating pump assembly as the pump rod
sleeve is under considerable spring tension.
The assembly must be pulled straight out and
not rotated during removal.
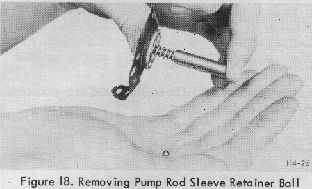
(15) Press the pump rod sleeve toward the
pump diaphragm, compressing the pump spring; and
allow the pump rod sleeve retainer ball to drop out
(rotate the sleeve if the ball sticks in place). Discard
the ball.
(16) Slide the pump rod sleeve and pump
spring off the pump diaphragm rod. Discard the pump
diaphragm and rod assembly.
(17) Using the thin-bladed screwdriver, pry the
pump operating lever retainer off the pump operating
lever stud. Discard the retainer.
Figure 20. Removing Pump Operating Lever
CAUTION
(18) Slide the pump operating lever off the stud.
Figure 21. Removing Choke Bracket Screw
(19) Remove the choke bracket screw and
lockwasher.
FLAT TIP PUNCH f
(1/8" DRILL
ROD MAY
BE SUBSTITUTED)
Figure 22. Removing Distribution Pin
(20) Rotate the choke plate past the full open
position until it is nearly inverted. Place the
distribution pin in a section of brass tubing with the
end of the tube bearing against the choke shaft. Using
a flat tip punch or a piece of 1/8 inch drill rod, drive
the pin flush with the choke shaft. Then, using a
smaller diameter punch or drill rod, drive the pin out
of the choke shaft. Refer to "Special Tools and
Improvised Tools" on page 10 for complete
information on the improvised tools.
NOT
In the illustration (Figure 22), a section of the
upper portion of the brass tubing is shown
cutaway for the purpose of clarity. Do not cut
out this section of tubing.